

Shaheer Akram
CEO at - SERP SolutionHe is an experienced SEO Specialist and content writer with a passion for driving online visibility and engagement. With years of experience in the digital...Read more
|
Getting your Trinity Audio player ready...
|
Welcome to the final manual on restoring your Shark Robot Vacuum to its factory settings! Have you ever felt annoyed with your vacuum’s overall performance, wishing you could begin afresh? Well, you’re in good fortune! In this step-by-step manual, we will stroll you through the simple method of resetting your Shark Robot Vacuum, putting you again on top of things of a pristine cleaning level.
Imagine a seamless vacuum, tackling dust and particles without a hitch. With our smooth-to-observe instructions, your Shark Robot Vacuum will soon act like the day you delivered it home. No greater troubleshooting complications or thinking about why it is no longer working as it must. We’re here to empower you with the knowledge to reset your shark robot vacuum effortlessly.
So, whether or not you’re a seasoned pro or a newcomer to the sector of robotic cleansing, join us as we embark on this adventure to reset your Shark Robot Vacuum and rediscover the pleasure of handy cleansing. Let’s dive in!
Table of Contents
Why Factory Resetting Your Vacuum is Important?
Factory resetting your Shark robotic vacuum is critical for preserving its foremost overall performance. Over time, the device can also encounter connectivity issues or software program system faults that may affect efficiency. You can troubleshoot those issues by performing a manufacturing unit reset and restoring your vacuum to its original settings.
Additionally, factory resetting allows you to clean out any stored records or possibilities that are probably inflicting malfunctions in the machine. This smooth slate ensures that your Shark robot vacuum operates easily and correctly, all through cleansing classes.
Moreover, regularly resetting your vacuum extends your lifespan by stabilizing harm from unresolved troubles. It’s like giving your tool a fresh start to serve you correctly in keeping your home clean and tidy.
In essence, manufacturing unit resetting isn’t always solving on-the-spot problems but also approximately ensuring the lengthy-term functionality and durability of your Shark robotic vacuum.
Step-by-Step Guide to Factory Reset Your Shark Robot Vacuum
Is your Shark robotic vacuum appearing up and needing a clean start? Factory resetting it might simply be the answer you’re searching for. Here’s a step-by-step guide that will help you navigate through the process.
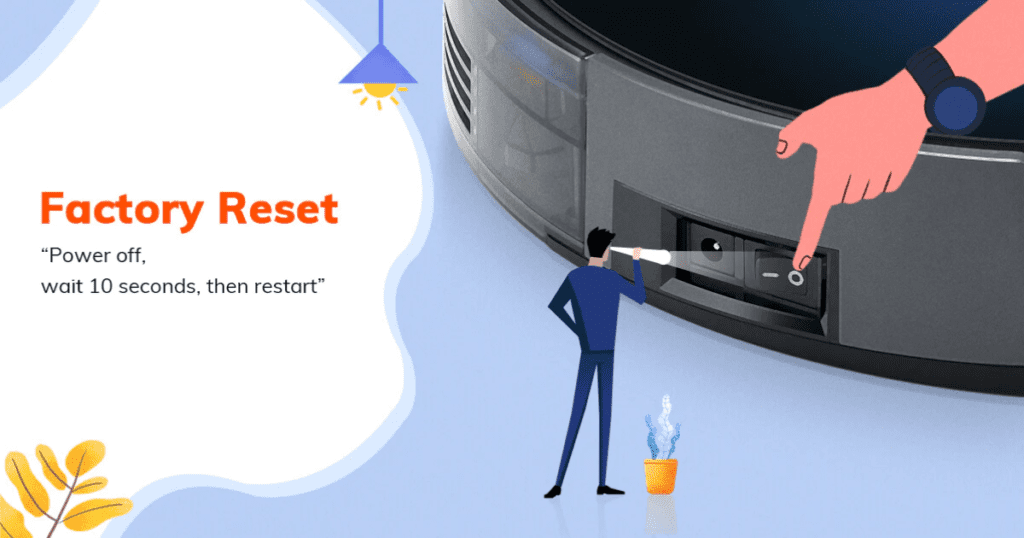
First, make sure your vacuum is powered off before starting the reset. This will prevent any ability issues at some point in the procedure.
Next, strive for a soft reset by conserving the dock button on your vacuum for approximately 10 seconds. This simple step may remedy minor system faults and lower your vacuum back on course.
If the tender reset does not do the trick, it is time to move on to a tough reset. Locate the reset button in your Shark robot vacuum (normally found close to the strength switch) and press it with a paperclip or comparable tool.
Once you have completed these steps, energy in your vacuum once more and notice if it has returned to its unique settings. If not, do not hesitate to contact Shark customer support for similar help.
Step 1: Preparing for the Reset
Before diving into the factory reset system on your Shark Robot Vacuum, preparing effectively is crucial. Start by ensuring that your vacuum is grown to become off and disconnected from its charging dock to avoid any potential troubles for the duration of the reset.
Next, locate the energy button to your vacuum – this can be key in initiating the reset technique. Familiarize yourself with the place of different crucial buttons or capabilities that can come into play at some stage in the reset, along with the dock button or Wi-Fi setup alternatives.
Take a second to check your vacuum’s manual for specific instructions associated with resetting. Understanding those details can help streamline the process and save you any confusion.
Gather any additional tools or sources you could need for troubleshooting, including a small screwdriver for accessing sure components if essential. With these preparations in location, you’ll be geared up to address the manufacturing unit reset with confidence and ease.
Step 2: Performing a Soft Reset
When troubleshooting your Shark Robot Vacuum, a soft reset can regularly do the trick. This step is like giving your vacuum a touch of virtual refresh, supporting cleaning out any minor issues that may be inflicting hiccups in its performance.
To carry out a smooth reset for your Shark Robot Vacuum, begin locating the strength button on the device. Hold this button for about 10 seconds until you notice some lights flashing or hear a beep – this indicates that the reset method has all started.
Once you’ve initiated the gentle reset, supply your vacuum a few moments to reboot. This simple action can remedy connectivity issues, software program system defects, or other minor problems occasionally without losing any saved settings or options.
Remember, acting a tender reset needs to be one of the first steps you’re taking while troubleshooting your Shark Robot Vacuum earlier than shifting directly to extra superior answers. It’s short, clean, and can save you from calling customer support.
Step 3: Performing a Hard Reset
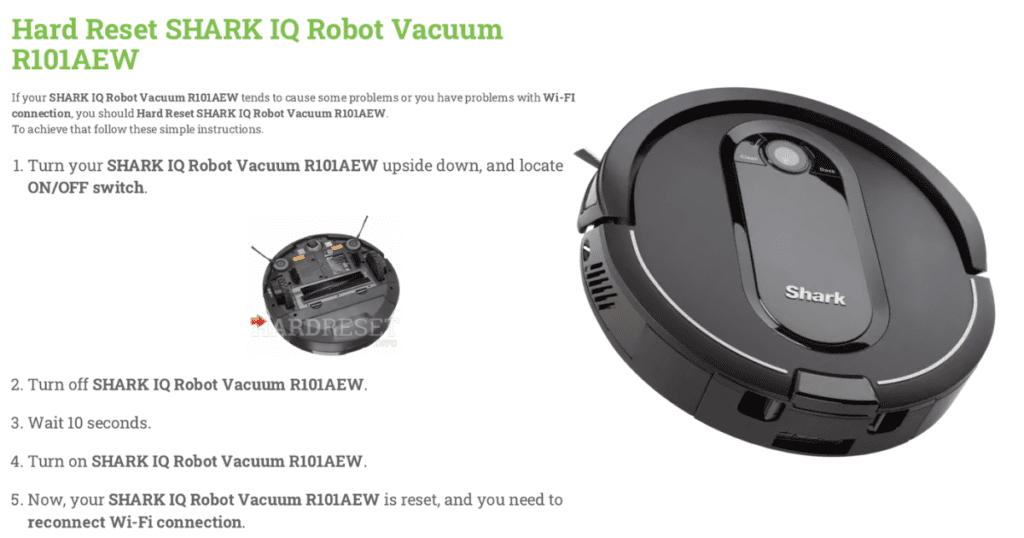
If you have attempted a soft reset on your Shark robotic vacuum and are experiencing problems, consider performing a difficult reset. This extra thorough technique can assist in resolving chronic troubles that the soft reset could not restore.
To start the hard reset, locate the reset button for your Shark robotic vacuum. It’s usually determined close to the strength transfer or beneath a panel.
Press and keep down the reset button for at least 10-15 seconds. You may also need to use a small tool like a paperclip to reach it.
After keeping down the button for the precise time, launch it and look ahead to your Shark robot vacuum to restart. This movement will restore all settings returned to their manufacturing unit defaults.
Remember that a tough reset should be performed as an ultimate inn if different troubleshooting steps have failed. If you are still determining any part of this manner, talk to your consumer guide for guidance or contact customer support for help.
Troubleshooting Common Issues During the Reset Process
If you come across any troubles for the duration of the factory reset manner of your Shark robotic vacuum, do not panic! Here are some not-unusual troubleshooting hints that will help you out.
Please ensure your vacuum is charged and ready to turn on earlier than trying to reset it. Low battery tiers can cause reset failures every so often.
If the soft reset does not paint, attempt a difficult reset by preserving down the dock and energy buttons concurrently for 10-15 seconds. This should reboot your device.
Ensure there aren’t any barriers blocking off the vacuum’s sensors or preventing it from connecting to Wi-Fi. A strong connection is critical for success.
If all else fails, discuss with the consumer manual or contact Shark customer support for assistance. Remember, endurance and staying power are key when troubleshooting technical troubles with your robot vacuum.
Tips and Tricks for Maintaining Your Shark Robot Vacuum
To maintain your Shark robot vacuum in top-notch condition, everyday protection is key. One crucial tip is to drain the dustbin after every cleansing session to prevent clogs and keep suction power. Additionally, test the brush roll and remove any tangled hair or debris that can restrict its performance.
Remember to easily filter frequently according to the manufacturer’s commands for the most useful filtration efficiency. It’s also a good idea to look into the wheels and sensors for any dirt construction that might impact navigation.
Another critical maintenance task is checking for put-on and tear on parts like brushes or side brushes, changing them to ensure they have powerful cleaning effects. Consider scheduling routine deep cleanings of your vacuum additives to extend their lifespan and keep them walking smoothly.
By incorporating those easy suggestions into your protection routine, you may enjoy a nicely maintained Shark robot vacuum with consistent cleaning and overall performance.
Final Thoughts
Factory resetting your Shark Robot Vacuum can assist in solving troubles and repairing its performance to the top-of-the-line ranges. Following the step-by-step guide in this newsletter, you can easily reset your vacuum and deal with any operational problems it may be experiencing.
Regular upkeep and proper care of your Shark Robot Vacuum are crucial for its longevity and performance. Remember to clean the brushes, filters, and sensors often to ensure clean operation. Keeping the charging dock area clean of limitations will save you from interruptions through cleansing cycles.
Incorporating these guidelines into your routine preservation agenda allows you to enjoy a domestic cleaner with minimum problems. With only some easy steps, you could maintain your Shark Robot Vacuum strolling smoothly for future years.
Read More About: Shark Robots
He is an experienced SEO Specialist and content writer with a passion for driving online visibility and engagement. With years of experience in the digital marketing.
- Latest Posts by Shaheer Akram
-
What is the new virus going around?
- -
Can Chromebooks get viruses?
- -
How to Check Your Phone for Viruses?
- All Posts
1 thought on “How to Factory Reset Your Shark Robot Vacuum Step-by-Step Guide”
Comments are closed.